Showing posts with label built ins. Show all posts

Monday, January 26, 2015

In which I see the light at the end of the tunnel

One of my New Year's resolutions was to set a blogging schedule for myself, and so far...oops. Christmas was exceedingly busy with non-home-improvement-related activities, and Jesse thoughtfully gifted me with the new XBox and a game I've been breathlessly waiting to play, so there's been quite a bit more digital adventuring than building. 

HOWEVER. Our kitchen has been a complete disaster since just after Thanksgiving, when I started in on the cabinets. 

Ah yes, the early stages of chaos. I remember it fondly.

Once I got the upper cabinets and the cabinet by the refrigerator built, it was time to paint. Naturally, this meant everything IN the cabinets had to come out, and so far...nothing has been put back. Needless to say, we've been eating a lot of takeout. (But we did find a fantastic new-to-us Thai place and a new Mexican place within walking distance. Good thing none of my resolutions involve dieting.)

Painting has been a rather slow process. I've been using Benjamin Moore's Advance in Super White (which is apparently the color one gets when one asks the guys behind the counter for "white, just white, the whitest white you've got") and it's my first experience using an alkyd paint. It's ridiculously expensive, but worth every penny. It's so low in VOCs that I barely needed to open any windows (awesome, since it was around 15 degrees here for a week or so) and dries to a hard, glossy finish that is much more resistant to scratches than the Metro Mountain Snow I've used everywhere else.

Speaking of cold temperatures, it was well below freezing around New Year's, and the gray cat next door decided he'd rather live with us, and kept trying to sneak into the house whenever anyone opened the door. Since he's not our cat but still a step above being a stray, I made him a fancy warm cat igloo that he has shunned in favor of a pile of paint rags I had in a box on the porch. Cats.

  Sad, empty cat igloo.

 Ungrateful gray cat. I did tape some cardboard over his box of rags to mitigate the wind somewhat.

Last week was the first week I really felt like I'd made any progress. I FINALLY got around to painting the awful beige ceiling and walls. Everything is a clean, crisp white (Metro Mountain Snow) except for the south and west walls, which are a fantastic leathery black I found in at the Powell Paint Center mis-mixed section. 

Once the ceiling was done, I could replace the light fixtures. It warms my heart to see the horrible track lighting and faux-Victorian flushmount sitting out on the back deck, just waiting to be taken to the dump. SO LONG, EIGHTIES MONTSTROSITIES! In their place are two schoolhouse semi-flushmounts I got on sale from Home Depot and spray-painted oil-rubbed bronze. (There were actual oil-rubbed bronze ones there, but they were $50 instead of $22, and the spray paint I like is like $4 a can...yeah, even I can do the math on that one.) I finally got around to spray-painting the pendant light over the sink a glossy black, and it looks so much better. When it was white, it sank into the background of the tile. Not anymore!

I also painted and installed the two salvage cabinet doors I got at the Rebuilding Store ages ago. They look perfect, and make a classy display case for all my milk glass.

Today, I put up trim. It still needs to be painted, but it already feels so much more functional. I love my kitchen! It's starting to look exactly like I'd pictured. 


Still on the docket:
- Patch and paint trim
- Make doors for upper cabinets
- Re-stain and seal lower cabinets
- Strip, stain, seal and laundry room and basement doors
- Paint window bench
- Install hardware
- Install pot rack (but where, that's the question we're still trying to answer)
- Clean like whoa because seriously, there is so much sawdust (also I accidentally knocked a liter of ginger ale off the top of the fridge today, which exploded and turned the floor into a slick of gingery sawdust sludge)

One of these days, we may even cook in the kitchen. In the meantime, I have leftover pineapple fried rice and Dragon Age Inquisition to keep me happy.



Tuesday, September 23, 2014

For queen and country!

How many crown-related titles can I come up with? Not many, apparently - I blame my heathen colonial roots on that. The only crowns we have in this country are the ones that come from the dentist. (Not that I have any of those. Anyway.)

I could blame the long radio silence on a great many things - namely, my lovely baby sister getting weddinged to her equally lovely wife - but to be perfectly honest, I've been avoiding the crown molding because it looks hard. I've probably watched two hours of Youtube videos of distinguished craftsmen earnestly explaining to their patient camera operators how to properly set a miter. I've slowly chopped about eight feet of crown into six-inch sections trying to get it right, but it's a complicated formula of bevel-miter-fence-crown, and while an infinite number of monkeys may eventually bang out the complete works of Shakespeare, this particular monkey doesn't have the finances for an infinite amount of crown. (Even as cheap as it is at my favorite store.)

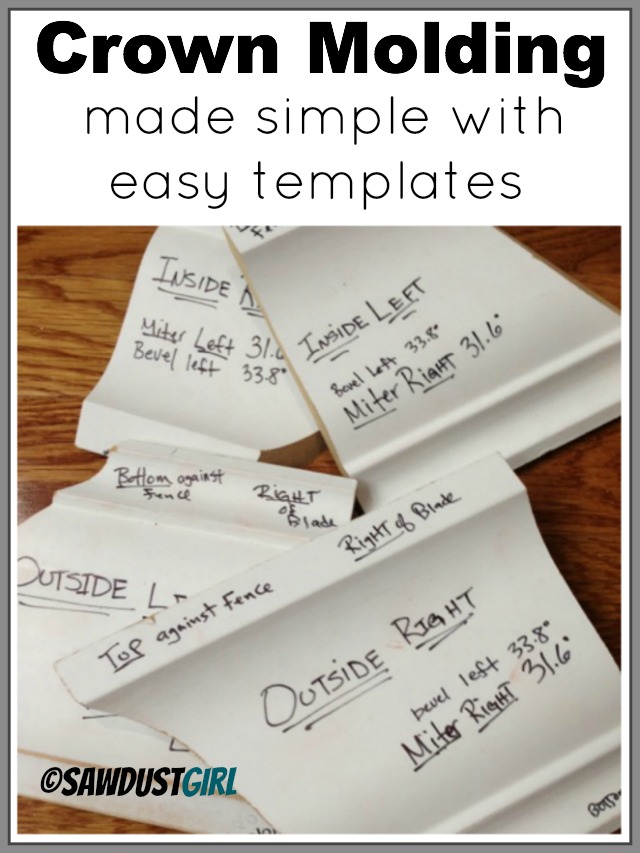
So...I've been avoiding it. Until tonight, when Incredible Builder Mom sent me a link on Pinterest that is probably the best tutorial I've ever seen in my life. 


Source: The ever-fabulous Sawdust Girl. I could kiss her dusty boots right now.

So I followed her directions, and made my own templates:


And once I got the bevel-miter-fence-crown combos ironed out, it was - dare I say - easy. I only stopped tonight once my project manager (aka Jesse) gently pointed out that it was getting late, and we like our neighbors and want them to continue liking us and our noisy pneumatic nailer. 


Yes, there are gaps large enough to drive a truck through, but that's what caulk is for, right? Right. It's part of the, erm, charm of discount trim. Or possible the innate charm of our house. Definitely not the fault of my miter saw Dad's miter saw. 

And yes, the ceiling paint does stop right in the kitchen. That's another project for another paycheck.


LOOK AT THAT! It looks like an actual almost-finished house. (And feminism be damned, that horrible boob light has got to go.)

And speaking of looking, I fully recognize that this blog is a vanity project. I am awesome. The things I do are awesome. Occasionally I even finish an awesome thing:


This is the built-in bookshelf in the dining room - painted and done! (Please ignore the monster plant. I rescued it from a dumpster right around the time we moved, but neither it nor I have been happy with any of the places I've put it in so far. It's a work in progress.) There are additional shelves drying in the garage, which hopefully I'll be able to put up tomorrow, provided I remember where all the hardware is. 

There is no before. There is only during. 
Construction can be very existential.
  
The bookshelves started out life as laminate IKEA BILLY units. I primed them with Zinsser water-based primer, which is my new favorite thing ever, because I didn't even have to sand the laminate before priming. This stuff adheres like crazy to EVERYTHING.(Including, um, the metal bits of the paintbrush, should one inadvertently allow it to dry. Oops) Once the bookcases were primed, I made a base out of 2x4s to raise them enough so our wide baseboard could comfortably wrap around, anchored the units to studs and added trim, caulked around the edges and painted. 


Yeah, I'm pretty pleased with how it's turned out so far.


In related news, I have finished five gallons of paint. This should be a triumphant story, but it's not. After relying almost exclusively on recycled or mismixed paint for my color needs, having to actually buy new white paint was annoying, and also having to pay $80 for a giant tub of Glidden Ceiling and Trim was even more annoying. I was certainly not going to pay twice that for the higher-quality Behr stuff, and the biggest tragedy of all is that Metro has been sold out of their Mountain Snow all freaking summer. It's a problem. The other problem? The coverage. I put four coats of the Glidden on the above bookshelf in the dining room IN ADDITION to the primer, and I swear there are still spots I can see the dark laminate lurking underneath. (I have been informed by my beloved that I may in fact be crazy. We do try to exemplify romance.)

So. It may be time to buy a brand of paint that doesn't suck. I can already feel my bank account crying. My paintbrush hand, however, is crying right now from overuse, so it may in fact be worth it. 


Saturday, August 30, 2014

Gimme a little less talk and a lot more action

August has been incredibly busy, first with my cousin's wedding in Montana - which was very lovely and fantastically fun - and then our dear friends Erik and Alex tied the knot last weekend. With my sister and her lovely wife getting weddinged in two weeks, September promises to be just as exciting. Forget June - late summer is the real wedding season!

Some highlights from Montana:


I am stubborn. Just ask this ceramic buffalo.

Being happy tourists with the fam at the Lewis and Clark museum in Great Falls.

See? Wipe the sawdust off and we look pretty darn good.

As such, I've been working on various projects in fits and spurts, but it doesn't feel like I've accomplished anything. (Although that's probably because I have about a million things going at once, so even if I do manage to finish something, it's right onto the next.) I do have a few awesome things to report.

You've got mail

The mailbox that came with the house was huge and didn't close very well, and only came with one key. I found a cute little one in the scratch-and-dent section at Home Depot, spray-painted it red because we obviously needed a red mailbox, and voila! It's less "hey you crazy people don't steal my mail" and more "welcome, nice postal carrier!" 


Before and after.

I used a matte Rustoleum spraypaint called "Paprika", which is slightly on the orange side of red. It'll work well for both fall and winter decorations. However, I didn't really think through the overall color scheme, and a red mailbox may preclude the red door I was thinking about. (Oops.) When we get around to painting the house at some point, I'd love to have dark gray walls with sharp white trim and colorful accents, and having two red things on the front porch might be too much red. (I may also be overthinking something we won't be able to afford for quite a while.) At some point, I want to replace the boring metal door with something with more character (and maybe a window). 

Moving up in the world

Even though we bought trim for the downstairs a few weeks ago, I've been putting it off because I still needed to paint the stairs, which could only be done on a day when I'm home alone and the cats are locked in the basement, to minimize feet and grubby little paws making a mess of the stain. I finally had that day a couple of weeks ago, and stained the treads and painted the risers. It looks about a thousand percent better! I still need to caulk along the edges and touch up a few spots where the painter's tape pulled off some of the polycrylic (my fault for taping when it wasn't quite dry - so impatient) but it's done enough to make me happy. 


Before, during and (mostly) after

 
Bringing dressy back

This is easily my favorite project I've finished, and I am SO FREAKING GLAD it's done. The next time I suggest stripping the paint from something, someone please hit me with a shovel, because DEAR GOD this was a real pain in the neck. SO MANY TINY CORNERS.

Sadly, I apparently didn't take any before shots, which I deeply regret because oh lordy it was ugly. Someone had abandoned this dresser on the sidewalk after coating it top-to-bottom in drippy gold spraypaint and then decoupaging heavy blue paper to the top. I stripped the paint with my trusty heat gun (probably 15 hours of stripping over the last three months) and then sanded and stained it with my favorite Minwax Red Oak. (I've used red oak on everything, from the shelves at the apartment to the stair treads to this dresser. It makes everything glow.) On a splurge, I added fancy little white drop pulls from Anthropologie. (Despite being ridiculously expensive for everything else, I've found Anthro to be pretty reasonable for hardware, especially since they have unique things you can't find elsewhere.)


Look, here it is lurking in the back of the picture 
of another project! Too embarrassed to show its face.


Ta da! All dressed up. (Please ignore my messy kitchen.)

I haven't decided if it's going to stay there in the kitchen, but it's nice having a little extra counter space, and I get to moon over my hard work every time I get a drink of water. Maybe I'm a snob, but I don't understand why people paint perfectly gorgeous wood. Guh, so gorgeous.

But it was free!

I love stuff. The only thing better than stuff is free stuff. Like...this goofy overbuilt entertainment center. 
So fantastic! So giant! So heavy! So...something!


The scene: a happy couple driving home from...somewhere.
Me: "STOP STOP STOP STOP I WANT THAT!" 
Jesse: "Wait, do you actually want that?" 
Me: "YES IT'S PERFECT AND I NEED IT."
Jesse (resigned): "Well, okay, let me go back around the block."
Me: [presses nose to window fervently praying no one else snatches it before we get there.]

And no, there was never any danger of anyone else snatching it. Even I know that. It was spraypainted a glossy black that was drippy and chipping. The black was actually very much okay - so much okay that I decided this crazy piece needed to stay black - but it needed a better paint job and a little TLC.

Enter my new toy, the Critter


Via Amazon. 

It's a tiny sprayer that hooks up to an air compressor and uses pint mason jars to hold the paint. I bought it because I've wanted a paint sprayer, and other bloggers absolutely rave about it. The mason jars are particularly handy, especially since I bought a bunch of resealable plastic lids at Fred Meyer, and can store the thinned paint in the mason jar until I need it again. (Like, say, for the second coat...if I need one.) Some paint I've used so far hasn't needed thinning, but the black definitely did, and I just added a bit of distilled water until it flowed freely. It makes painting SO FAST AND EASY. 


Repainted with Behr Marquee Black Basalt in eggshell. 
(Yes, I BOUGHT fancy black paint and it was really freaking expensive.) 


I still need to attach wheel casters to the bottom (because seriously, this thing weighs twice as much as I do) but when it's done I think it'll be good for the media room/den/video game cave, because the shelves we've got in there right now aren't really wide enough for the Xbox, and I'd like to be able to close off the TV and all its associated cords and accessories if needed. (Ostensibly, my goal is for the video game cave to be a potential second guest room if needed, and as such, it should be as pleasant as possible. 

 Not just a one-night stand

...actually two nightstands. I had two of the little RAST dressers left over from the master bedroom built-ins (which are still not done, pending arrival of the knobs at some point) so I painted and stained them, and dressed them up with some fancy new pulls from Home Depot.


Painting! (Ignore the legs on the dressers...I added them for height and decided later they didn't match the overall aesthetic, so I took them off again. What can I say - I'm mercurial.)


And done! And blurry. Oh, phone camera.

When Jesse and I moved in together in 2009, our one-bedroom apartment had room for a bed and one night stand, which we've been sharing ever since. It is the height of luxury to finally be in a place where I don't have to roll over him to get a drink of water in the middle of the night. As an added bonus, I picked up two RANARP lights from IKEA and installed those on either side of the bed. Now we each have our own nightstand and light! 

It's like living in a hotel, only with more cats. 


A sinking feeling

Remember how I love free stuff? Our lovely friends Faith and Janet remembered, too, and gifted us their castoff sink from their long-overdue bathroom remodel. 


Now they have TWO fancy new bathrooms, and we have one fancy old sink to replace one of the two monstrosities that live in the upstairs bathrooms. The bathroom remodels are well down the line (I'm crossing my fingers that the kitchen is first) but this sink is cool and old, and, as Faith pointed out, even comes with a caked-on chip of soap. It's ready to go! Thanks, ladies!

The Doors

Remember also how I was wrestling with what color to paint the door so it coordinated-with-but-didn't-match our pretty paprika mailbox?

Eventually, all these problems mostly solve themselves. 


In my defense, I DIDN'T MEAN TO. I went to the Habitat for Humanity ReStore to get a couple of new $0.50 paint scrapers, since I irreparably gummed up my other one scraping the paint off the gold dresser, and while I was there, I had to check out the door selection, since I still haven't found any solid core five-panel interior doors like I want, and these matching beauties were 50% off. TWO GIANT DOORS WITH GIANT WINDOWS AND LOVELY WOOD BITS THAT MATCH THE WOOD BITS ON MY SCREEN DOORS, FOR ONLY $100?? I spent about an hour staring at them, trying to justify the purchase in my head, but in the end, they're EXACTLY the right dimensions for both the front and back doors, so of course they came home with me. I'm sure they were originally for a double entrance, but I'm content to split them up and have two gorgeous entries. The varnish is pretty much gone on the side that faced all the weather, so I'm going to (gently) sand and refinish, but other than that, they're in great shape. Also, I would like to point out, heavy as hell

I love them. I love them so much I want to pet them and coo at them. Doors!

This weekend

It's a three-day weekend! And in celebration of Labor Day, I plan to labor heavily for its entirety. My goal is to get at least SOME of the trim painted and maybe maybe maybe even up - I know, it's good to dream big - so we'll see how much happens. It's sprinkling rain right now and there's absolutely no room in my garage to set up a painting center, soooo....more indoor projects may take precedence. (Like vacuuming. This place is so furry you have no idea.)

Monday, August 4, 2014

Into the closet

I am feeling incredibly bad-ass tonight. Hulklike, even. Why, you ask? Well, just the tiny little matter of I CONQUERED ELECTRICITY, THAT'S RIGHT I'M LIKE THOMAS EDISON PLUS MCGYVER.

Ahem. This project concerns the closet in the master bedroom. After five years of cramming all of our clothes into a single tiny apartment closet, I am thrilled beyond mention to have a walk-in closet, despite the bare sheet rock and the graffiti in the corner announcing that a previous occupant, Justin, is a "Krip Killer". Really, the only problem with the closet is that it's so unfinished it's basically a glorified crawlspace, but around here, "unfinished" just makes me salivate.


Source: Pinterest. Eventually, it's going to look like this, only BETTER.


In the meantime, it's still a massive work in progress, and until tonight, basically unusable. There are no "before" pictures of our closet, because you couldn't see. There are two fixtures in the closet, a regular bare wall-mount bulb that burned out the day after we moved in, and a 24-inch fluorescent tube bracket with no tube. I'd installed some brackets and rods a couple of weeks ago, but I quickly discovered that if I can't see what I'm grabbing, it all just ends up in a pile on the floor. (Yes, Mom, let's be honest - the pile was going to happen anyway, but the dark only aided its development.)

So tonight, after a little experimentation with the circuit breaker box and my trusty voltage tester*, I braved the risk of shock and death to enlighten our closet.

*Seriously, everyone should have a voltage tester. It's the best. Cutting a hole in the wall? Make sure there's nothing live behind it. Moving an outlet? Make sure it's not active. Moved into a house where absolutely nothing is labeled in the breaker box? Shut things off one by one and find out!


IT WORKS AND THE HOUSE ISN'T BURNING DOWN.  Those are definitely my two criteria for a successful project. I'm so excited I can hardly stand it. We had a horrible instructor for my electrical class, and even though I studied as best I could, I left that class feeling like I knew less about electricity than I did going in. But we neeeeeeded a light, so I read about a million articles online, and obsessively followed the directions inthe box. And it worked! And nothing's on fire! AND WE CAN SEE IN THE CLOSET!

Seriously, it's amazing. I'm not so keen on the light itself, but it was $7 at Home Depot, and Goodwill occasionally has cute schoolhouse shades for ~$3 (rather than the $45 ones at Rejuvenation or Schoolhouse Electric). I drool over the fancy ones, but really, the Free Box Goodwill is more my budget.

Source: Pinterest. If I keep my eyes open, I'll find one of these eventually.
I've seen them before.

In addition to not starting electrical fires, I've also been busy sawing holes in walls. When we first started on this remodeling adventure, Jesse was very concerned - bordering on alarmed - at my tendency to wing a project. (In my defense, the plans are all IN MY HEAD. I've got it all figured out. I just need to do it.) After the garage doors, the screen doors and the table, he's starting to relax, and when I say, "I'm going to buy $200 worth of cheap pine dressers from IKEA and tear down one of the bedroom walls," he just nods and offers to drive. (Seriously, I have the best husband in the universe. I am an incredibly lucky lady.)

Our bedroom has very large crawlspaces. After years of trying to utilize every last cubic inch of apartment space, my brain is still very much attuned to creative organization. Plus, I love the look of built-ins, which are very much in keeping with the age of this house.

Source: Pinterest. SO MUCH STORAGE. SO MUCH CLASS.

For ours, the cheapest and most efficient way to do built-ins was to buy a bunch of unfinished pine dressers from IKEA, and modify them so they fit between the studs. (I am 90% sure the studs are not load-bearing, so I probably could have cut them and not had an issue, but because the fasteners are buried beneath sheet rock and insulation, I opted not to investigate. Plus, that 10% uncertainty is kind of a big deal when it comes to our roof.)

Enter the RAST, beloved of bloggers for its solid construction and teeny, tiny pricetag:
Source: IKEA. Do a search for these things. The internet loves 'em, and for good reason.

 At $35 a piece, the RAST was much cheaper than the next comparable dresser anywhere else, and much cheaper than the wood I would have needed to buy to make a dresser myself. (Not to mention my carpentry skills, while steadily growing less horrifying, are nowhere near the competency required for this.) I bought six of them, and so far have only used four. My original goal was to construct them and just slide them in between the studs, but the dressers ended up being about three inches too wide, so I used my miter saw - I mean, Dad's miter saw that I'm just borrowing - to trim down the necessary parts. As anyone who's ever assembled IKEA furniture knows, there are lots of tiny holes for screws and other joining hardware, so I had to make an emergency trip to Home Depot for a jig to keep my drill straight. The jig definitely earned its keep on this project. I'd have ruined everything without it.

Halfway done. The vacuum is for domestic tranquility, via sawdust mediation.

I'd originally wanted to stack two dressers, but the pitch of the roof precluded that, so instead, I added an inset shelf area on the top of each dresser. I had leftover boards from taking down the wall, so I used those to line the insets.


Like our tiny electric stove? It was another gift of free furniture.
 It's so cheesy with its fake flames, but I totally, totally love it. It'll be so cozy in the winter!

Sadly, I've come to the conclusion that despite my love of stained natural trim, I think it's easiest to do white trim in this particular house, especially in our cabin-esque bedroom. I've been vacillating between painting the planks a nice, clean white or leaving them as they are, and mostly out of my sheer laziness, I think they'll stay the way they are, which means white trim and white built-ins. And while trim is definitely next on the to-do list, we're going to Montana for my cousin's wedding this weekend, so everything will stay naked and un-trimmed for at least another week. 

In the meantime, I'd also like to state for the record that Pecan is a disturbingly strange cat. I hauled the miter saw upstairs to expedite RAST trimming, and instead of running from all the noise like a rational creature, this cat was SLEEPING IN THE HALLWAY the whole time. I'd say she was deaf, but she definitely hates the vacuum cleaner, and is convinced that any kitchen sound means an imminent meal. Sass, on the other hand, has spent most of the week napping in the basement. It's been pushing 90 degrees here in Portland, so frankly, I don't blame her a bit.


Mooooom, what are you doing in there?

Why'd you lock me owwwwt? I'm only trying to help.