We're in the throes of Snowpocalypse 2014 here in Portland - and by that, I mean at least three snowflakes were seen somewhere in the northern half of the state in the last twenty-four hours - and predictably, all the projects I suddenly have a hankering to do involve things in the garage, and there are four very icy deck steps between here and there, so...here I am, indoors. (I'm not keen for a repeat of February's ice-related knee injury, which laid me up for three days, although being confined to the couch and playing video games certainly isn't the worst way to spend a long weekend.)
It's probably a good thing I'm kept indoors tonight, because there are a million indoors-related projects that need finishing. Case in point, I organized part of the craft room, unpacked a couple of boxes, rescued all our winter jackets from the basement, and did a bit of arranging in the guest room.
It can be argued that paying the mortgage on a home is one of the most grown-up things you can do, but mostly, I've been vacillating between feeling like I'm just playing house and the guilty exhilaration that comes from demolishing and then building something permanent in a structure. (An emotional holdover from all the years of renting? Maybe. It's a bit of a paradigm shift to go from "Oh shit, we're never getting our deposit back" to "These improvements build equity!") It doesn't really help that there isn't a single room in the house that feels done yet, at least not to the point where I can sit back and be relatively satisfied with the layout and decor.
One thing that has helped immensely are the blinds. Typically, they were a complete hassle to obtain - they were backordered for a month, and then when they finally arrived, I discovered I'd ordered the wrong length because I'm an idiot who only measures width, so back they went - but oh, how they make things feel a little more grown-up.
Yeah, the window trim hasn't been painted, and I haven't put up any curtains yet, but it's still SO MUCH BETTER.
When we moved in six months ago (wait, what???) one of our very first Home Depot purchases was a pack of fold-up paper shades, which we've been grudgingly living with ever since. Like with everything else, I have strong opinions on window treatments (surprise) and I knew we absolutely had to have the 2-inch blinds. After living with cheap plastic blinds for years and hating them, the 2-inch ones feel much more sophisticated (and will probably be easier to vacuum cat hair off of). I finally scored the blinds I wanted from JC Penney, which despite my measuring mishap has been absolutely the best place to shop. The blinds in question seem to be perennially 50% off, and when I ordered then, I scored an extra 20% off from a random weekend sale, making them significantly cheaper than Home Depot or online retailers. They're also decently well-made for the price, with metal gears and the movements feel very solid. Plus, when I realized my measuring mishap, I took them back to the store and discovered they have free direct-to-home shipping for returns. Awesome! Now we have light, privacy, and fancy blinds.
It's very weird, though, how one's definition of "reasonable" changes upon signing the closing papers. If you'd told me I'd spend $180 on blinds for eight windows, I'd have laughed like crazy, but now it seems like a total steal. In the apartment, if I'd gone to Home Depot for a $5 can of spray paint or something, that's what I'd get, and I'd be done. Now, if we get out under $100, it's a cheap trip. (And I've probably forgotten like four things, at least one of which will necessitate a return trip later in the day.)
But it's worth it. Every strange bruise and mysterious cut, the constant layer of grime and the fact that I basically sign my paycheck over to Home Depot every two weeks - it's totally worth it. I love this house. I love working on it. I love figuring out how to get what we want without spending a million dollars. Some of it has definitely been annoying - plumbing, I'm looking directly at you - but it's a huge learning experience, and I love it, and every so often, I'll catch a glimpse of what it's going to look like when it's all done, and it looks amazing.
For now, we're still covered in sawdust and eating pizza more nights than not, but at least we've got fancy new blinds.
Thursday, November 13, 2014
Tuesday, November 4, 2014
Kitchen, now with 50% more grout!
It's election night, and instead of constantly refreshing the Google elections results, I'm electing to stare at my gorgeous new tile.
I'm still not convinced the light over the sink should stay white. I'm strongly leaning toward spray-painting it a matte black right now, but I'm committed to living with it awhile, as my wiseproject manager husband suggested.
Originally, I'd planned on painting the upper cabinets white, and staining the lowers with my favorite Minwax red oak, but right now, I'm kind of loving the juxtaposition of the wood with the crisp white subway tile and the dark industrial concrete. The 80s varnish absolutely has to go (it's not in very good shape anyway, and the cabinet doors especially are pretty rickety) but I'm starting to think having that rich, warm reddish-brown wood on the upper cabinets as well as the lowers would look pretty fantastic. (Plus, it would save me from having to paint, and given a choice between staining and painting, I'll choose stain every time.) My next project is the window seats by the back door, so I've got plenty of time to mull over my options.
Happy belated Halloween! We had 59 trick-or-treaters come to our door, which was more than I could ever have hoped for. It was perfect - most of the kids were some form of zombie, and most of the costumes were home made. I love our neighborhood!!
I finished the last bits of tile Saturday night, just in time for us to host a houseful of wonderful people for our friends Faith and Janet's surprise wedding shower. It went off without a hitch - there was so much love in our house I'm surprised it didn't float off the ground - and I am very pleased to know that there is PLENTY of room to have twenty lovely people hanging out with us. It was a great trial run for future holiday gatherings.
Yesterday I spent four hours grouting and scrubbing the grout, but the extra time and effort was totally worth it. Those lines are PERFECT. I used the leftover charcoal gray grout from the floor, and it really makes the tile pop. I also glued the poor broken corner back onto our beautiful sink, and we will never mention the sink incident ever again.
Seriously. Look at this:
Before (with drywall - please ignore my haphazard, paranoid screw patterns)
I was not expecting tiling a wall to be such a pain in the ass. My tiles were sliding everywhere. Finally, I figured out that applying the grout and allowing it to dry for five or six minutes made it much stickier, and then the tiles would stay (mostly) in place.
And now look at it!
I'm still not convinced the light over the sink should stay white. I'm strongly leaning toward spray-painting it a matte black right now, but I'm committed to living with it awhile, as my wise
Originally, I'd planned on painting the upper cabinets white, and staining the lowers with my favorite Minwax red oak, but right now, I'm kind of loving the juxtaposition of the wood with the crisp white subway tile and the dark industrial concrete. The 80s varnish absolutely has to go (it's not in very good shape anyway, and the cabinet doors especially are pretty rickety) but I'm starting to think having that rich, warm reddish-brown wood on the upper cabinets as well as the lowers would look pretty fantastic. (Plus, it would save me from having to paint, and given a choice between staining and painting, I'll choose stain every time.) My next project is the window seats by the back door, so I've got plenty of time to mull over my options.
Happy belated Halloween! We had 59 trick-or-treaters come to our door, which was more than I could ever have hoped for. It was perfect - most of the kids were some form of zombie, and most of the costumes were home made. I love our neighborhood!!
Wednesday, October 22, 2014
That sinking feeling
(Apologies, this post was SUPPOSED to go live before our trip to Alabama last week, but the faucet was STILL LEAKING so I couldn't post without finishing my project. Humph.)
So...the kitchen faucet sprang a leak and we decided to remodel the whole room. (I'm using the royal we, in case you were wondering.)
This army is run by General Issues.
Helpful plumbing assistant Sassafras.
So...the kitchen faucet sprang a leak and we decided to remodel the whole room. (I'm using the royal we, in case you were wondering.)
Let me back up. I came home from work a few weeks ago, and went to get a glass of water, and ended up with wet socks. (Never a good feeling, that.) The culprit? The cold water side of the kitchen faucet. Jesse was out with friends, so I was home alone with a potentially major plumbing issue. I did what any self-sufficient adult would do: I panicked and ran to Google.
This army is run by General Issues.
The first order of business was to turn off the supply lines to the faucet itself, which the internet helpfully noted would be under the sink. Except when I looked, there weren't any valves on the supply lines under the sink. After further investigation, I found the cold water valve on the ceiling in the basement, but the hot water valve was...nowhere. So the next logical step was to turn off the water at the hot water tank.
Helpful plumbing assistant Sassafras.
Because our house is a carefully-assembled series of "What the hell were they thinking?!" constructions, I was (mostly) not surprised to find out that there IS no hot water cut off valve at the tank. Yep, there were 40 gallons of hot water between me and a replacement gasket. So I did the obvious next step: opened myself a beer and called my mother.
The consensus was that we needed a plumber. Since the leak was contained (cold water was off, horrible warning taped on sink, Jesse warned via text, etc) it wasn't an emergency situation. The next morning, I called the best plumber Angie's List could recommend, and the scheduler helpfully noted that the first available appointment was October 6th...ten days away.
Well, it's not like we've been cooking much anyway. I took the appointment, and resolved to make room in the laundry sink for dishes.
THE SINK
In the meantime, there was an IKEA sink somewhere in transit, slowly making its way to my waiting arms. This sink is the pinnacle of my kitchen remodel hopes.
The consensus was that we needed a plumber. Since the leak was contained (cold water was off, horrible warning taped on sink, Jesse warned via text, etc) it wasn't an emergency situation. The next morning, I called the best plumber Angie's List could recommend, and the scheduler helpfully noted that the first available appointment was October 6th...ten days away.
Well, it's not like we've been cooking much anyway. I took the appointment, and resolved to make room in the laundry sink for dishes.
THE SINK
In the meantime, there was an IKEA sink somewhere in transit, slowly making its way to my waiting arms. This sink is the pinnacle of my kitchen remodel hopes.
The IKEA Domsjo double-bowl. It's huge. It's lovely. I need it.
Our kitchen is expansive. Our sink is currently cast iron and lemon yellow, which is cute, but not really the look I'm going for.
My decorating technique has always been to figure out what I like, and then to figure out how I can get it. (Or at least recreate it, which is often the tougher task, since I unfortunately have very expensive tastes.)
My Pinterest board is full of kitchens like this:
Source: Pinterest, that beloved timesuck
What do these gorgeous kitchens have that ours does not? Cabinets to the ceiling, and farmhouse sinks. There's a gross soffit above our cabinets, but hey, I can remove that. The issue I was running into, however, was that sinks? Are really really freaking expensive. Like thousands of dollars expensive. So when I found the IKEA Domsjo for $300, I almost died. And then I really did almost die, because it wasn't in stock.
Turns out, there were some supply issues with the double-bowl Domsjo, and for almost a month, I had it saved in my online shopping cart, biting my nails because it was no longer posted on the website and looked very much like it would be discontinued. The first paycheck I could afford it, I sprang, and my giant sink began lumbering on its two-week journey across the country. (Apparently Boston was only place that had it in stock.)
This story ends happily, though, because I have my fancy sink, and it's now back in stock at my local IKEA, so everyone else can have a fancy sink, too.
THE REMODEL
When I ordered the sink, I didn't really have a plan, besides "OH GOD IT'S ONE THIRD THE PRICE OF ALL THE OTHER SINKS AND IF IT GETS DISCONTINUED I WILL CRY BUY IT NOW BUY IT NOW!!" (All you advertisers, take note: the scarcity argument actually works.) Then, our faucet broke, and suddenly our sink was due to arrive two days before the plumber. And suddenly it made sense to install a new faucet sink with the new sink. And since the sink was going to be replaced, I could redo the counters like I'd been wanting. And if I was going to redo the counters, I might as well take down the soffits beforehand, so falling drywall wouldn't damage the new surface.
It's a slippery slope over here at Left of Center, but I managed to convince my project manager (aka Jesse) that it would in fact be worth it.
I started my three-day weekend with the joyous arrival of The Sink. Much crooning ensued.
Then, the soffit demolition started.
Being the crazy person I am, I'd researched everything I could find about soffits prior to demo. The internet indicated that almost all soffits were just a simple frame and drywall.
That is not what I found.
Yep, that's drywall over 1/2 inch plywood, which is covering up...a heating duct. WHO BUILDS SOFFITS OUT OF PLYWOOD? I was not warned about this.
The best part? The soffit wouldn't even have been necessary if the original builders had put the heating duct eight inches higher. Yep, they sacrified something like 30 square ft of potential cabinet space because they didn't feel like moving the duct.
I called Incredible Builder Dad. His sage advice was to put the drywall back up, and then wait a year or two for when we could take the kitchen down to the studs.
Sorry, Dad, I'm pretty sure you said, "Use the reciprocating saw and do it now."
It was gross. Like, beyond gross. The entire soffit apparently served as a mouse superhighway for the last thirty years, and I was SO GLAD for my super filter mask because YUCK.
Here, speaking of filters, have an artistic shot of the chaos. Yes, I did also pull down the wall next to the furnace chimney. Why? Um, it was easier than the soffit. Also, it was there. Jesse wasn't home. Did I need a reason?
Finally, after two crazy days of kitchen demo, the soffits were out, the heating duct was duly adjusted, and it was time to do the countertops.
If money were no object, I would have put in soapstone. It's gorgeous and patinas nicely. You can sand out scratches, it's non-reactive, and so much more user-friendly than granite or marble. From everything I've read, it's very much a "living" surface, one that changes over time and ages with the house.
Except not only is soapstone very very expensive, it's almost impossible to source on this side of the country. Apparently it's easier to find on the East Coast, where it's a much more common material, but here on the left coast, you have to special order it, which makes it even more expensive. And we have a lot of counter space. It just wasn't going to happen, at least not in this decade.
In the meantime, our countertops were navy blue laminate, and although they were in mostly usable condition, it wasn't very pretty. I'm a superficial person, I need it to be pretty. I mean, with our gorgeous new sink, the entire kitchen needed a makeover.
After extensive research, I discovered a technique online where I could skimcoat the existing laminate with a concrete-like product called Ardex Feather Finish. By adding black concrete pigment, I could approximate the color and texture of the soapstone I wanted, for a fraction of the cost.
The entire process of skimcoating was 100% easier than I expected. Because some of the laminate was peeling, I added a layer of 1/4 inch backerboard to all the countertops, so the Ardex had a perfect surface to adhere to. Each layer was supposed to take 15 minutes to dry, but it ended up being more like 12 hours; I was being enthusiastic about putting it on.
I could have gotten away with one or two layers of the Feather Finish, but I wasn't achieving the charcoal color I wanted, so I ended up doing four layers, with the proper color ending up being one bottle of Quickrete charcoal concrete pigment per box of Feather Finish.
Once the final layer was dry, I sanded it first with 60 grit sandpaper, to knock down all the large lumps, and then 120 grit to polish it up. I was supposed to sand between each layer, but I'm lazy, so lumps from the earlier coats ended up showing through the final coat. The effect actually looks like striations in real stone, so that was a pleasant surprise.
The end result is fantastic. I love it, and it's so much better than what I could have hoped for. The texture is very much like honed stone, and there are just enough imperfections that it won't be too much of a tragedy the first time I drop a heavy bowl on it.
Right now, it's got two coats of 511 Impregnator Sealer on it to prevent staining and make it water-resistant, so it's darkened up quite a bit, and when that's cured in a day or two, I'll put on two or three coats of Minwax Polycrylic on it to prevent scratches. I use Polycrylic to seal all of my projects - including the kitchen table I refinished at the old apartment - and I've never once had an issue with scratching or peeling, and once it's cured, both it and the Impregnator are food-safe.
So. Counters are done. Time to install the gorgeous sink!
Before I'd done the Feather Finish, I'd made a template of the sink from the sink box (carefully tracing around the edges of the sink to ensure proper fit) and cut the counter to size. It should have been perfect...except it wasn't, as I am coming to realize about this house. We couldn't get it in. So we pulled it back out, and sawed some more off the edge of the cabinets, and tried again.
Still nope. So out it comes, and we saw some more off, and that doesn't work, so we cut from a different area, and that STILL doesn't work. I MEASURED THE DAMN SINK. ITS CARDBOARD TEMPLATE HAS AN INCH OF SPACE AROUND THE EDGE! There is NO REASON this sink should not be fitting, except it just. WON'T.
We haul it back out - keep in mind that this sink weighs more than I do - and I hack quite a bit off the cabinets.
At this point, it's getting close to 9pm. We both have to be up by 6am, and I, for one, would REALLY like to shower and get the countertop dust out of my hair, but the water is still off because the faucet is disconnected, so we can't. So we try to wiggle it in place one more time.
And then this happens:
In case you can't tell, that's the corner of my beautiful, brand new sink, no longer attached. I almost cried.
That's when we decided to call it a night.
The next day, we inspected the damage. It turns out that with a little epoxy, the crack will be almost invisible, and the sink itself isn't structurally damaged. After way too much finagling, it is, at this point, precisely level and more or less in position.
THE FAUCET
After the ordeal of the sink, I thought the faucet would be fairly straightforward. Oh, how innocent I was.
Jesse and I had spent the better part of the week prior trying to find a faucet we liked. Our options were limited by a) budget and b) the single hole in the Domsjo. I really wanted something in a warm, classic brass, but in the end, we settled on a Hjuvik from IKEA. It wasn't the cheapest, but it was big enough for our giant sink, and it felt much more sturdy than comparable models at the plumbing store. Plus, it came with a 10-year warranty, and warranties are good, right?
It turns out that most IKEA faucet supply lines do not connect up with American plumbing without a little help. The supply lines were 3/8", while the lines from the wall were 1/2". After reading many horror stories online about Frankensteinian DIY line connections, we ended up just finding a couple of 3/8" to 1/2" adapters at Home Depot. While we were there, we picked up a few extra parts for the drain assembly, since I'd been wrestling with the stupid garbage disposal for the last few hours and couldn't seem to make any headway.
So we got home, and managed to cobble together the drain pipes, with no small amount of silicone goo. Then, we hooked up all the supply lines, and discovered that they both LEAKED. And not just a little bit. We took our degraded gaskets to the plumbing store down the street, and were told that not only did they not carry that size, we'd have to run entirely new line. Yes, we will eventually, since we've got polybutylene lines that are no longer up to code, but we were flying to Alabama the next day for a weeklong vacation, and our sink was still dripping a quart of water every few hours. (And remember, there is no water shutoff. Even turning it off at the curb didn't seem to make any difference.)
Long story short, I gobbed everything up with approximately a pound of silicone goo, and then we left on vacation. (That's another post for another time.) While we were gone, I ordered some assorted gaskets from Amazon, and they were waiting for us when we got home. Tonight, I spent three hours with my head under the sink, carefully putting everything back together and chasing drips around, but we've finally done it.
We're not going to win any prizes for beauty, but the faucet works, the drain works, and nothing is leaking (knock on wood).
My gorgeous sink is installed and functional, and we can FINALLY go back to taking hot showers without having to go to the basement to turn the water on first. Plumbing would be SO MUCH EASIER if it didn't involve water.
Turns out, there were some supply issues with the double-bowl Domsjo, and for almost a month, I had it saved in my online shopping cart, biting my nails because it was no longer posted on the website and looked very much like it would be discontinued. The first paycheck I could afford it, I sprang, and my giant sink began lumbering on its two-week journey across the country. (Apparently Boston was only place that had it in stock.)
This story ends happily, though, because I have my fancy sink, and it's now back in stock at my local IKEA, so everyone else can have a fancy sink, too.
THE REMODEL
When I ordered the sink, I didn't really have a plan, besides "OH GOD IT'S ONE THIRD THE PRICE OF ALL THE OTHER SINKS AND IF IT GETS DISCONTINUED I WILL CRY BUY IT NOW BUY IT NOW!!" (All you advertisers, take note: the scarcity argument actually works.) Then, our faucet broke, and suddenly our sink was due to arrive two days before the plumber. And suddenly it made sense to install a new faucet sink with the new sink. And since the sink was going to be replaced, I could redo the counters like I'd been wanting. And if I was going to redo the counters, I might as well take down the soffits beforehand, so falling drywall wouldn't damage the new surface.
It's a slippery slope over here at Left of Center, but I managed to convince my project manager (aka Jesse) that it would in fact be worth it.
I started my three-day weekend with the joyous arrival of The Sink. Much crooning ensued.
Seriously, that is the biggest box in the world.
And that box contained the biggest sink in the world.
IT'S SO PRETTY I'M GONNA DIE.
Then, the soffit demolition started.
Safety first!
Being the crazy person I am, I'd researched everything I could find about soffits prior to demo. The internet indicated that almost all soffits were just a simple frame and drywall.
That is not what I found.
Yep, that's drywall over 1/2 inch plywood, which is covering up...a heating duct. WHO BUILDS SOFFITS OUT OF PLYWOOD? I was not warned about this.
The best part? The soffit wouldn't even have been necessary if the original builders had put the heating duct eight inches higher. Yep, they sacrified something like 30 square ft of potential cabinet space because they didn't feel like moving the duct.
I called Incredible Builder Dad. His sage advice was to put the drywall back up, and then wait a year or two for when we could take the kitchen down to the studs.
Sorry, Dad, I'm pretty sure you said, "Use the reciprocating saw and do it now."
It was gross. Like, beyond gross. The entire soffit apparently served as a mouse superhighway for the last thirty years, and I was SO GLAD for my super filter mask because YUCK.
Here, speaking of filters, have an artistic shot of the chaos. Yes, I did also pull down the wall next to the furnace chimney. Why? Um, it was easier than the soffit. Also, it was there. Jesse wasn't home. Did I need a reason?
I'm pretty sure the author of xkcd is watching me on hidden cameras.
Finally, after two crazy days of kitchen demo, the soffits were out, the heating duct was duly adjusted, and it was time to do the countertops.
If money were no object, I would have put in soapstone. It's gorgeous and patinas nicely. You can sand out scratches, it's non-reactive, and so much more user-friendly than granite or marble. From everything I've read, it's very much a "living" surface, one that changes over time and ages with the house.
Source: Pinterest
Except not only is soapstone very very expensive, it's almost impossible to source on this side of the country. Apparently it's easier to find on the East Coast, where it's a much more common material, but here on the left coast, you have to special order it, which makes it even more expensive. And we have a lot of counter space. It just wasn't going to happen, at least not in this decade.
In the meantime, our countertops were navy blue laminate, and although they were in mostly usable condition, it wasn't very pretty. I'm a superficial person, I need it to be pretty. I mean, with our gorgeous new sink, the entire kitchen needed a makeover.
After extensive research, I discovered a technique online where I could skimcoat the existing laminate with a concrete-like product called Ardex Feather Finish. By adding black concrete pigment, I could approximate the color and texture of the soapstone I wanted, for a fraction of the cost.
The entire process of skimcoating was 100% easier than I expected. Because some of the laminate was peeling, I added a layer of 1/4 inch backerboard to all the countertops, so the Ardex had a perfect surface to adhere to. Each layer was supposed to take 15 minutes to dry, but it ended up being more like 12 hours; I was being enthusiastic about putting it on.
I could have gotten away with one or two layers of the Feather Finish, but I wasn't achieving the charcoal color I wanted, so I ended up doing four layers, with the proper color ending up being one bottle of Quickrete charcoal concrete pigment per box of Feather Finish.
Once the final layer was dry, I sanded it first with 60 grit sandpaper, to knock down all the large lumps, and then 120 grit to polish it up. I was supposed to sand between each layer, but I'm lazy, so lumps from the earlier coats ended up showing through the final coat. The effect actually looks like striations in real stone, so that was a pleasant surprise.
Yep, that's my ShopVac taped to my orbital sander. A poor girl's dust reduction system, if you will.
The end result is fantastic. I love it, and it's so much better than what I could have hoped for. The texture is very much like honed stone, and there are just enough imperfections that it won't be too much of a tragedy the first time I drop a heavy bowl on it.
Right now, it's got two coats of 511 Impregnator Sealer on it to prevent staining and make it water-resistant, so it's darkened up quite a bit, and when that's cured in a day or two, I'll put on two or three coats of Minwax Polycrylic on it to prevent scratches. I use Polycrylic to seal all of my projects - including the kitchen table I refinished at the old apartment - and I've never once had an issue with scratching or peeling, and once it's cured, both it and the Impregnator are food-safe.
So. Counters are done. Time to install the gorgeous sink!
Before I'd done the Feather Finish, I'd made a template of the sink from the sink box (carefully tracing around the edges of the sink to ensure proper fit) and cut the counter to size. It should have been perfect...except it wasn't, as I am coming to realize about this house. We couldn't get it in. So we pulled it back out, and sawed some more off the edge of the cabinets, and tried again.
Still nope. So out it comes, and we saw some more off, and that doesn't work, so we cut from a different area, and that STILL doesn't work. I MEASURED THE DAMN SINK. ITS CARDBOARD TEMPLATE HAS AN INCH OF SPACE AROUND THE EDGE! There is NO REASON this sink should not be fitting, except it just. WON'T.
We haul it back out - keep in mind that this sink weighs more than I do - and I hack quite a bit off the cabinets.
I'm pretty sure the N is for NOT FITTING.
At this point, it's getting close to 9pm. We both have to be up by 6am, and I, for one, would REALLY like to shower and get the countertop dust out of my hair, but the water is still off because the faucet is disconnected, so we can't. So we try to wiggle it in place one more time.
And then this happens:
In case you can't tell, that's the corner of my beautiful, brand new sink, no longer attached. I almost cried.
That's when we decided to call it a night.
The next day, we inspected the damage. It turns out that with a little epoxy, the crack will be almost invisible, and the sink itself isn't structurally damaged. After way too much finagling, it is, at this point, precisely level and more or less in position.
THE FAUCET
After the ordeal of the sink, I thought the faucet would be fairly straightforward. Oh, how innocent I was.
Jesse and I had spent the better part of the week prior trying to find a faucet we liked. Our options were limited by a) budget and b) the single hole in the Domsjo. I really wanted something in a warm, classic brass, but in the end, we settled on a Hjuvik from IKEA. It wasn't the cheapest, but it was big enough for our giant sink, and it felt much more sturdy than comparable models at the plumbing store. Plus, it came with a 10-year warranty, and warranties are good, right?
The inspiration, via Pinterest.
The reality, via IKEA.
It turns out that most IKEA faucet supply lines do not connect up with American plumbing without a little help. The supply lines were 3/8", while the lines from the wall were 1/2". After reading many horror stories online about Frankensteinian DIY line connections, we ended up just finding a couple of 3/8" to 1/2" adapters at Home Depot. While we were there, we picked up a few extra parts for the drain assembly, since I'd been wrestling with the stupid garbage disposal for the last few hours and couldn't seem to make any headway.
So we got home, and managed to cobble together the drain pipes, with no small amount of silicone goo. Then, we hooked up all the supply lines, and discovered that they both LEAKED. And not just a little bit. We took our degraded gaskets to the plumbing store down the street, and were told that not only did they not carry that size, we'd have to run entirely new line. Yes, we will eventually, since we've got polybutylene lines that are no longer up to code, but we were flying to Alabama the next day for a weeklong vacation, and our sink was still dripping a quart of water every few hours. (And remember, there is no water shutoff. Even turning it off at the curb didn't seem to make any difference.)
Long story short, I gobbed everything up with approximately a pound of silicone goo, and then we left on vacation. (That's another post for another time.) While we were gone, I ordered some assorted gaskets from Amazon, and they were waiting for us when we got home. Tonight, I spent three hours with my head under the sink, carefully putting everything back together and chasing drips around, but we've finally done it.
We're not going to win any prizes for beauty, but the faucet works, the drain works, and nothing is leaking (knock on wood).
My gorgeous sink is installed and functional, and we can FINALLY go back to taking hot showers without having to go to the basement to turn the water on first. Plumbing would be SO MUCH EASIER if it didn't involve water.
Tuesday, September 23, 2014
For queen and country!
How many crown-related titles can I come up with? Not many, apparently - I blame my heathen colonial roots on that. The only crowns we have in this country are the ones that come from the dentist. (Not that I have any of those. Anyway.)
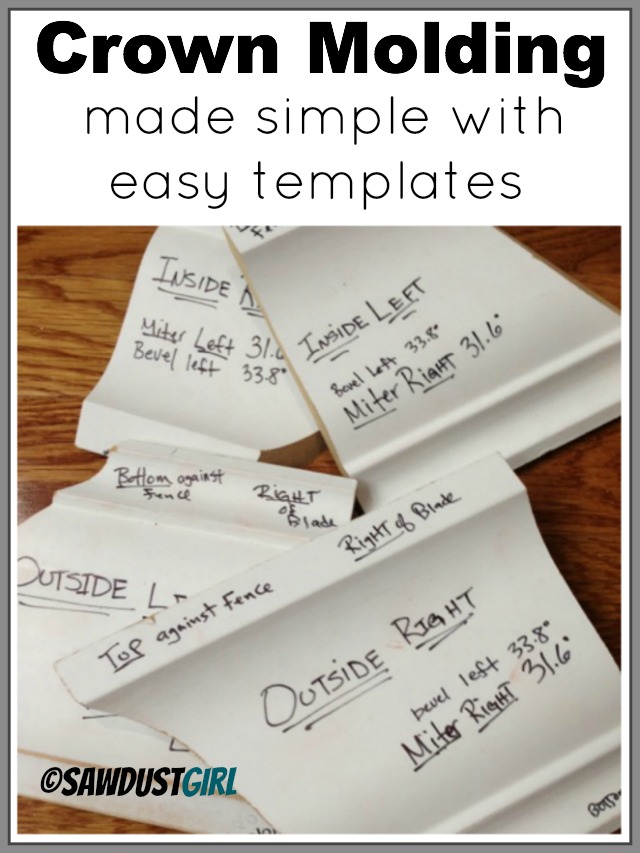
I could blame the long radio silence on a great many things - namely, my lovely baby sister getting weddinged to her equally lovely wife - but to be perfectly honest, I've been avoiding the crown molding because it looks hard. I've probably watched two hours of Youtube videos of distinguished craftsmen earnestly explaining to their patient camera operators how to properly set a miter. I've slowly chopped about eight feet of crown into six-inch sections trying to get it right, but it's a complicated formula of bevel-miter-fence-crown, and while an infinite number of monkeys may eventually bang out the complete works of Shakespeare, this particular monkey doesn't have the finances for an infinite amount of crown. (Even as cheap as it is at my favorite store.)
So...I've been avoiding it. Until tonight, when Incredible Builder Mom sent me a link on Pinterest that is probably the best tutorial I've ever seen in my life.
Yes, there are gaps large enough to drive a truck through, but that's what caulk is for, right? Right. It's part of the, erm, charm of discount trim. Or possible the innate charm of our house. Definitely not the fault ofmy miter saw Dad's miter saw.
And yes, the ceiling paint does stop right in the kitchen. That's another project for another paycheck.
And speaking of looking, I fully recognize that this blog is a vanity project. I am awesome. The things I do are awesome. Occasionally I even finish an awesome thing:
This is the built-in bookshelf in the dining room - painted and done! (Please ignore the monster plant. I rescued it from a dumpster right around the time we moved, but neither it nor I have been happy with any of the places I've put it in so far. It's a work in progress.) There are additional shelves drying in the garage, which hopefully I'll be able to put up tomorrow, provided I remember where all the hardware is.
The bookshelves started out life as laminate IKEA BILLY units. I primed them with Zinsser water-based primer, which is my new favorite thing ever, because I didn't even have to sand the laminate before priming. This stuff adheres like crazy to EVERYTHING.(Including, um, the metal bits of the paintbrush, should one inadvertently allow it to dry. Oops) Once the bookcases were primed, I made a base out of 2x4s to raise them enough so our wide baseboard could comfortably wrap around, anchored the units to studs and added trim, caulked around the edges and painted.
In related news, I have finished five gallons of paint. This should be a triumphant story, but it's not. After relying almost exclusively on recycled or mismixed paint for my color needs, having to actually buy new white paint was annoying, and also having to pay $80 for a giant tub of Glidden Ceiling and Trim was even more annoying. I was certainly not going to pay twice that for the higher-quality Behr stuff, and the biggest tragedy of all is that Metro has been sold out of their Mountain Snow all freaking summer. It's a problem. The other problem? The coverage. I put four coats of the Glidden on the above bookshelf in the dining room IN ADDITION to the primer, and I swear there are still spots I can see the dark laminate lurking underneath. (I have been informed by my beloved that I may in fact be crazy. We do try to exemplify romance.)
So. It may be time to buy a brand of paint that doesn't suck. I can already feel my bank account crying. My paintbrush hand, however, is crying right now from overuse, so it may in fact be worth it.
I could blame the long radio silence on a great many things - namely, my lovely baby sister getting weddinged to her equally lovely wife - but to be perfectly honest, I've been avoiding the crown molding because it looks hard. I've probably watched two hours of Youtube videos of distinguished craftsmen earnestly explaining to their patient camera operators how to properly set a miter. I've slowly chopped about eight feet of crown into six-inch sections trying to get it right, but it's a complicated formula of bevel-miter-fence-crown, and while an infinite number of monkeys may eventually bang out the complete works of Shakespeare, this particular monkey doesn't have the finances for an infinite amount of crown. (Even as cheap as it is at my favorite store.)
So...I've been avoiding it. Until tonight, when Incredible Builder Mom sent me a link on Pinterest that is probably the best tutorial I've ever seen in my life.
Source: The ever-fabulous Sawdust Girl. I could kiss her dusty boots right now.
So I followed her directions, and made my own templates:
And once I got the bevel-miter-fence-crown combos ironed out, it was - dare I say - easy. I only stopped tonight once my project manager (aka Jesse) gently pointed out that it was getting late, and we like our neighbors and want them to continue liking us and our noisy pneumatic nailer.
Yes, there are gaps large enough to drive a truck through, but that's what caulk is for, right? Right. It's part of the, erm, charm of discount trim. Or possible the innate charm of our house. Definitely not the fault of
And yes, the ceiling paint does stop right in the kitchen. That's another project for another paycheck.
LOOK AT THAT! It looks like an actual almost-finished house. (And feminism be damned, that horrible boob light has got to go.)
And speaking of looking, I fully recognize that this blog is a vanity project. I am awesome. The things I do are awesome. Occasionally I even finish an awesome thing:
This is the built-in bookshelf in the dining room - painted and done! (Please ignore the monster plant. I rescued it from a dumpster right around the time we moved, but neither it nor I have been happy with any of the places I've put it in so far. It's a work in progress.) There are additional shelves drying in the garage, which hopefully I'll be able to put up tomorrow, provided I remember where all the hardware is.
There is no before. There is only during.
Construction can be very existential.
The bookshelves started out life as laminate IKEA BILLY units. I primed them with Zinsser water-based primer, which is my new favorite thing ever, because I didn't even have to sand the laminate before priming. This stuff adheres like crazy to EVERYTHING.(Including, um, the metal bits of the paintbrush, should one inadvertently allow it to dry. Oops) Once the bookcases were primed, I made a base out of 2x4s to raise them enough so our wide baseboard could comfortably wrap around, anchored the units to studs and added trim, caulked around the edges and painted.
Yeah, I'm pretty pleased with how it's turned out so far.
In related news, I have finished five gallons of paint. This should be a triumphant story, but it's not. After relying almost exclusively on recycled or mismixed paint for my color needs, having to actually buy new white paint was annoying, and also having to pay $80 for a giant tub of Glidden Ceiling and Trim was even more annoying. I was certainly not going to pay twice that for the higher-quality Behr stuff, and the biggest tragedy of all is that Metro has been sold out of their Mountain Snow all freaking summer. It's a problem. The other problem? The coverage. I put four coats of the Glidden on the above bookshelf in the dining room IN ADDITION to the primer, and I swear there are still spots I can see the dark laminate lurking underneath. (I have been informed by my beloved that I may in fact be crazy. We do try to exemplify romance.)
So. It may be time to buy a brand of paint that doesn't suck. I can already feel my bank account crying. My paintbrush hand, however, is crying right now from overuse, so it may in fact be worth it.
Wednesday, September 3, 2014
Honey, you should see me in a crown...
This week has been bzzzzzzzy. Not that the others aren't...I'm just feeling more than a little self-imposed pressure. I told myself ages ago that I wanted to at least get the downstairs trim up in time for the deluge of relatives for my lovely sister's wedding...which is next weekend. Time crunch! Am I close?
For the love of god someone please paint over the fire alarm shadow. That's just gross.
Um. We're getting there. And so far, it's only Thursday! I got time, I got time. I've got NINE DAYS. And I don't recall explicitly saying I'd have everything PAINTED by the wedding. (Details.)
Luckily, the seemingly-endless linear footage of MDF trim we got at my new favorite store came primed, so all I have to do is slap enough white paint on it to make it less of a chore when I go back through and caulk and fill all the nail holes I'm leaving. This is my first time using a pneumatic nailer, so perhaps I can be excused for taking WAY too long to realize it was jamming every other nail, so most of the baseboards I've put up are completely covered in holes that do not actually have nails in them. (I was sitting there on the floor trying to figure out why thirty nails didn't seem to be actually holding the baseboards on the walls. Oops.) In the end, Incredible Builder Dad came through with valuable wisdom, and recommended oiling the nailer. Turns out two drops of sewing machine oil in the air inlet before every use makes a happy, dare I say well-oiled nailer. KACHUNK KACHUNK KACHUNK.
Look at that! Baseboard, shoe and all. Just gorgeous, that's what that is.
(Never mind the bookcase. That's getting painted later.)
So far, with nine days to go, I've got all of the baseboard with at least one coat of paint. Most of the living room/dining room baseboard is in place, and has even been shod by the stairs. Half the crown has been painted, and some of it is up, although I've been avoiding the bits that need to be coped, because that just looks annoying. (It won't be. I found a great tutorial for Dremel coping, and if there's anything I love, it's an excuse to Dremel something.)
It's starting to look like a real, livable house! And it's a mess. Naturally.
I'm not 100% sure that weird stair column is structural, but I'm also not sure it's not, so...
I still haven't decided what to do with it.
I, um, still don't have any sawhorses.
What I do have is a little black truck, which works just as well.
In yet another chapter of But It Was Free!: An Autobiography, we were on our way to our friends' house last Sunday for hamburgers and s'mores, when what do my searching eyes behold?
Free chairs! And despite being white and so very, erm, retro, they are not only in good shape, they are mostly clean. And now they're mine. (No, I have no idea what I'll do with them. Don't ask questions!)
Subscribe to:
Posts (Atom)


.jpg)
.jpg)
.jpg)
.jpg)


.jpg)
.jpg)


.jpg)
-EFFECTS.jpg)


.jpg)
.jpg)
.jpg)

.jpg)
.jpg)

.jpg)


.jpg)
.jpg)
.jpg)
.jpg)

.jpg)